


Kolari
-
Mensajes
2.191 -
Ingresó
-
Última visita
Tipo de contenido
Perfiles
Foros
Calendario
Tienda
Todo lo publicado por Kolari
-
Sensores parking 4 delante + 4 detras
Kolari responde a Yul de discusión en Audi A6 / Allroad C6 (2005 - 2011)
El que estoy instalando yo (metasystem active 4/14) tiene el cable del zumbador con referencia....de audi y sus aritos...que casualidad: o se lo fabrica o se lo compra (lo dudo). Luego estos italianos puede ser que también le fabriquen algo al grupo VAG. -
3ª Compra conjunta Vag-com 812.4+805.0 no se bloquea
Kolari responde a txispis de discusión en Compras Conjuntas
Es lógico que el encargado no anticipe dinero de nadie...sólo faltaría. En ese caso de que alguien no pague ya le correremos a gorrazos y le pagaremos con su misma moneda jejeje!!! Las compras conjuntas es lo que tiene: que dependes de terceros. ¡¡¡¡Ánimo que ya nos falta poco para poder j*der la centralita con el cable!!!! Si más de uno nos arrepentiremos de aprender a utilizarle... -
referencia para la compra de un interruptor
Kolari responde a multiusos de discusión en Audi A6 / Allroad C6 (2005 - 2011)
Yo estaba en el mismo punto con el tema del pulsador-interruptor y tras deshechar el relé con enclavamiento (que necesita dos pulsadores) y ver un poco caro el tema del botón "a medida" de nuestro compañero (que además no lleva led de funcionamiento como el original del parktronic) he encargado una placa de 15 euros que transforma el pulsador en interruptor. Es muy pequeña (60x30x30mm) y la pondré pegada a la trasera de la centralita del parktronic 4/14 de Metasystem para los sensores delanteros. Así podré usar el botón pulsador del parktronic original como interruptor. El botón del a3 "passenger eject" con el dibujito del enlace de la página web ... es la cañaaa!!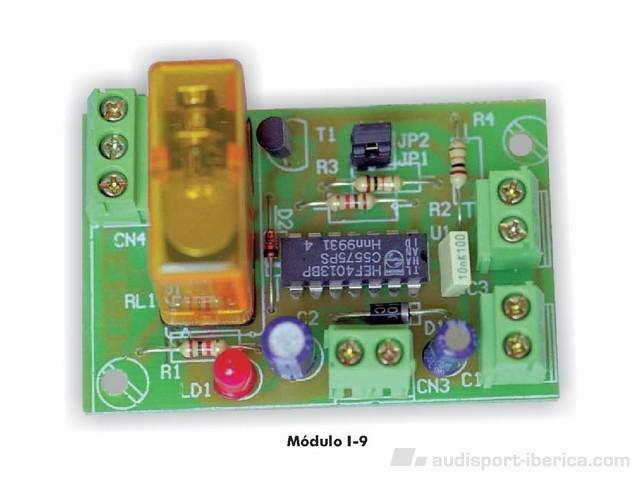
-
Ya, ya...eso lo dices porque te he copiado los cromados de la luna...jaja!!! Acuéstate pronto...
-
...ni caso...en directo es un coche bastante feooooo.... Saludos afonsit.
-
Si lo son y el proveedor es de fiar. Le compré algo y muy bien. anklappbar=abatible Ojo: no tiene luz de cortesía o ambiente como los del paquete confort.
-
Si parece que valga sin problemas, no obstante el precio parece similar al del dension y este además te da entrada de usb para discos duros, llaves, lector multitarjeta sd... y una toma auxiliar. El de ebay solo da interconexión para ipod. Es buena noticia que algun proveedor saque mas cosas en fibra optica para nuestros coches. Saludos.
-
Como quitar la "chapita-logo" del conce?
Kolari responde a Siaükia de discusión en Cuidados básicos y limpieza del automóvil.
Hay talleres que con una maquina te lo quitan por presión sin dejar marcas pero es fácil retirar todos los distintivos por uno mismo con un dni enjabonado con mistol o similar. Luego el exceso de pegamento se retira con cuidado usando un paño. Saludos. -
3ª Compra conjunta Vag-com 812.4+805.0 no se bloquea
Kolari responde a txispis de discusión en Compras Conjuntas
-
parrilla s6 ¿donde la habeis comprado?
Kolari responde a dufbeer de discusión en Audi A6 / Allroad C6 (2005 - 2011)
Majote...mil gracias ya lo sabes... -
necesito PDF, desmontaje banqueta posterior A6 4F Avant
Kolari responde a txispis de discusión en Audi A6 / Allroad C6 (2005 - 2011)
Ya,ya...pero cuando oiga el clack y se piense que lo ha j*dido dirá el Txispis: ¡¡uff, uff, menos mal que me lo esperaba...ya me lo dijo Picasso!! La próxima me saco el autocad en 3d, lo renderizo, lo doto de relieve aplicando unas texturas realistas y...acabo el año que viene porque no controlo nada. Me alegro de que te sirva. Por cierto los soportes del clack dice el Elsawin que hay que sustituir cada vez que se quiten los asientos...ni de coña. No se rompen ni queriendo. No obstante si ves que no ajustan al 100% cómpralos porque son baratitos baratitos... -
necesito PDF, desmontaje banqueta posterior A6 4F Avant
Kolari responde a txispis de discusión en Audi A6 / Allroad C6 (2005 - 2011)
Primero tiras de un extremo delantero (junto a los asientos delanteros) hacia arriba con ganas: oyes un clack y es que se ha soltado del encastre, luego repites en el otro extremo (junto a la otra puerta), otro clack. Luego metes la mano entre el respaldo y la banqueta y haces un movimiento de hacia atrás y hacia arriba para liberar un enganche, primero en un extremo y luego en el otro y vualá. Esquema cutre: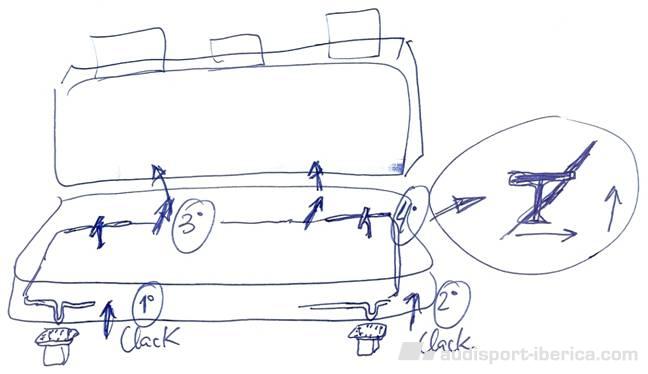
-
Molduras Cromadas A6 rectiling +2008
Kolari responde a asantos de discusión en Audi A6 / Allroad C6 (2005 - 2011)
Me temo que tienes que cambiar los listones completos (no las puertas xD) ya que no van pegadas sino insertadas en un rebaje. A mi me las trajeron equivocadas cuando pues las del s6 y se las devolví. Los listones van con tornillos desde dentro y con unos enganches laterales tipo corredera. Siempre puedes poner pegada una tira cromadita tipo tuneado...pero no te lo recomiendo!!!! <_< Por ahí venden un kit para el a6 4f de unas molduras que van en las 4 puertas colocadas longitudinalmente pero a media altura, no recuerdo dode las ví (estas si eran adhesivas). -
como se desmontan los botones de la guantera y del check??
Kolari responde a demon de discusión en Audi A6 / Allroad C6 (2005 - 2011)
gracias , es lo que necesitaba saber , pero me parece una pieza muy endeble , no se partira? No debería, pero por si acaso... ya sabes... con cuidadín. Por ahí venden "ganzúas" especiales de plastico blando para automoción para no rallar los embellecedores y cargarte las grapas de las puertas y demás historias que desmontamos. Yo utilizo las "rasquetas" que son flexibles que se usan para quitar burbujas al colocar vinilos y demás.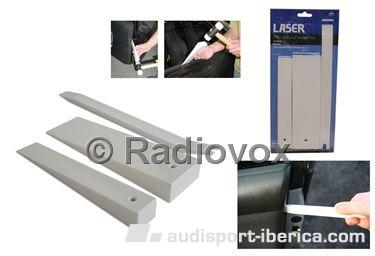
-
como se desmontan los botones de la guantera y del check??
Kolari responde a demon de discusión en Audi A6 / Allroad C6 (2005 - 2011)
Demon: Creo recordar por un fichero que leí que se hace así: en cada uno de los botones si te fijas verás que tienen una separación entre los pulsadores superiores e inferiores un poco más ancha:eso es un embellecedor pequeño que has de retirar sin "marcar" haciendo palanca por un extremo, luego tienes ya el acceso a una abertura en la que has de insertar una herramienta de audi que te la puedes hacer tu mismo pues se trata de una variila con la punta en forma de gancho que la debes de introducir y luego tirar hacia tí para extraer el conector completo. La herramienta es la m¡sma que se usa para sacar las rejillas de aireación. Saludos. -
El propio difusor del rs6 para colas ovaladas se puede poner.
-
-
Kike: Entonces si es que se trata de que han cambiado la referencia puede que si te valga. Saludos.
-
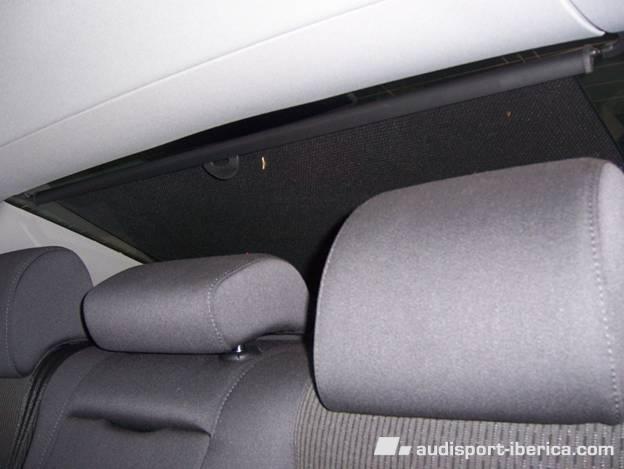
Efectivamente, hay que cambiar los revestimientos interiores de las puertas traseras por otros con la cortina lateral manual incorporada y para la eléctrica trasera hay que cambiar la bandeja por la que lleva la cortina incorporada más el cableado hasta la consola central donde va el pulsador. Cuando se engrana la marcha atrás se baja sola. La trasea eléctrica cubre un poco más la luna que la oem del enlace que os he puesto. Y por el contrario las de quita y pon de JNV cubren la totalidad de las lunas.
-
seran facil de poner? Sinceramente: no. A mi me costó bastante ya que hay que atornilarlas desde abajo.
-
Texto interesante: This is a short and simple guide on how I did when I upgrade to MMI HIGH in my Audi A6 Avant -06! I started by searching parts that I is both on ebay and from the Swedish scraps. The parts I found and installed are: 7" MMI HIGH Screen 4F0919603B Head Unit with FBAS 4E0035729A Radio Box 4F0035541L Navigation DVD 4E0919887M CD changer MP3 4E0910110C Hybrid TV Tuner 4E0910148B Indoor GPS antenna with 5m cable Trunk Media Rack 4F0035205A 8 Buttons MMI controller 4F1919611M Display Trim so the 7" Screen will fit Head Unit trim 4F1035462 The cables I ordered are: LUDS cable (between the screen o main unit) Basic-> High cable (to replace the connector behind basic + CD player + power connectors) 5m Fakra Cable Female-Female (for FBAS, between the main unit and TV Tuner) 2x5m Fakra Cable Female-Male (for extension of the radio cable from front to rear) Power Cable for TV Tuner + Rear units and 3 cables GND, K Diagnose, 12V (Power cables for Radio, DVD Navigation, TV Tuner) MOST Fiber cable extension for all rear units MOST Fiber cable extension for CD Changer optional: TV Antenna Cable, 2xAV input cables Apart from this, so bought me a cablecutter kit + car audio cable (red) 1.5mm at Biltema When I had all stuff I started to tear and build .. NOTE remove the negative cable on the battery!! Started in the trunk and took away the right panel so that I came to the fuses located inside the door. Did the right fuse holder (beige-brown) and used the No 7 from the top (an empty space with power already on one side) Placed there a cable I built with a female and male contact as I then pressed down into the fuse holder. Then began to enter the red 1.5mm cable through and behind bars and then stand behind the hedge where I had taken up the beige brown holder. in nr7 fixed empty spot I pushed through my red cable so that it arrived on the other side and put a like female contact that I had on the other side .. then I putted a 5A fuse in this place and so was power ready .. Then I took off the entire side of the interior for easier work .. and screwed also removed the slot for DSP and putted it to the side to later Then, I finished the red wire along the top and the ceiling to the other side where I join the cable with the red 12V wire that provides enhterna power. Placed on a round tray contact GND cable and screwed into the chassis. Then the cable went into DSP so is there a green with purple stripes that I had to cut and then join with K Diagnose cable. After this, I built up the media racket with DSP on top, then Radio Box, then NAV DVD player, then in the bottom the TV Tuner that I screwed in. After this so I put it very close and started to connect the power cables to the devices and the most fiber cables. On each fiber contact, there was an arrow in which direction the light was sent so you can adjust the number of contacts to how many units you have .. First into the DSP, then into the DVD NAV, then into the TV Tuner and next into the Radio, and late into the cable that goes to front again. After this, I linked up FBAS cable and the radio antenna cable and GPS cable for GPS antenna. The racket on the right place and hid the wires behind the rack. Began then loosen the edges in the rear and the front seat,, I had also lift the rear and side support at the back .. also protection under the steering wheel .. Then after that so I started to tear in the front and tore out the handtray and the old CD player (Required special tools to get the CD player) then when it was detached and its square connector behind the CD player and MOST fiber. Then to remove the old screen, so you are forced to remove the fans and the row of warning triangle light and ESP button and these are so into hell so you can really take in and I destroyed some plastic things stuck there .. Valid on both sides of the wheel then remove them, so be careful, but take that shit out! Then you should take off buttons in instruments sarge gray little line between the keypad is lifting so you may get better when to pull the buttons(Check, + -, etc. Light button to get waste into a small screwdriver to prize out and .. It will be a bit ugly marks, but something u can live with .. When this is done, so is there in all some 8mm screws to be removed after this happen, the whole sarge + screen + instrument completely resolved only to release the wires .. Now that the screws are loose, so I remove the instrument from sarge and stick it on the new sarge with larger holes for the 7" screen .. even screw the 7" screen with screws that I took from the old screen. Then I put this in your luggage while waiting for putting on right place but not yet .. Beginning disassemble my middle console, loosen sides sitting with a screw and late plastpluttar keeping it fixed .. screws on each side sit at the feet. then by lifting the rubber mats in the console, so there are 2 screws that are screwed off after this so, it is the fan out behind the center armrest, and inside there is a 12mm screw holding the armrest unload this and remove armrest .. after that, so it sits at the bottom in the back with their plastic "freeze" on each side to keep the console .. after that it is completely loose and can be removed .. then there are 2 Torx screws on the sides to keep the part with mmi buttons, etc. .. loosen them, and the 2 screws that are under the ashtray in the front. Then lift the leather at the gear and this framework can pull up .. then it's just o lift to the entire plastic buttons that sit in.. note that it is stuck in the cables so do not drag .. one at the cigarette socket, one at parking brake, an ashtray at giving lighting (this I missed and break the contact, but a little glue fixed the whole thing) after that it was loose .. Then I installed from the old 4buttons MMI rate and put in an 8 button with nav, NAME, TEL, etc. buttons .. then putted it aside .. Start now pull up the cables when I how everything would look like drug ruling gone the furthest in the left rail and late during wheel and used the tape because they would not be against something important and abraded tearing etc.. Propelling them also around other cables and late behind where the screen usually sit and ago during which handtray would sit .. Took a tape and gentle up and fastglue and glued solid GPS antenna to the left of airbagthing sitting in there and found a flat place without metal in the way and glued firmly on in the large instrument panel that goes throughout the box to get a clear view upwards (no metal in the way) Then after that, so, I took LUDS cable through and lay one end where the screen should be and the other end where the handtray usually. then I fixed LUDS cable to the screen, and sat back sarge with screen and instrument again .. screw it and put back the fans. Also took the chance to replace the AC control to a Climate PLUS controller. Now I used the Basic-> HIGH cable which is a large square she contact and cables that go from the current to the head unit and CD drives. Linked in the big square plug from the old CD / radio in this female. then I took the main unit and connect screen LUDS cable and FBAS and the red power connector. Then I extended the most fiber cable with a connector for MP3 CD changer and linked to CD changer got cable in and sent back to the baggage. Then in with Most fiber cable in the main unit. Then I screwed fixed the main unit in the ceiling where the handtray to sit .. Then I switched the radio cable into the existing white o yellow cable. After this, I mounted it hand tray, with a power cord, and the vacant most fiber cable visible in the tray where the cd / radio, sat before. Then with handtray on place, I pressed the cables into the MP3 CD changer. When this was done, was it just to fit everything back in their places where they sat before .. center, bars, etc. .. Took a couple days for me because I have a bitch that need to come there and make that and make that it all the time so did like 2h jobs at a time! The funny thing is that after I changed everything and then launched and tested so everything worked, it worked right away! All without Climate PLUS controller worked adopt it in the Component protection mode! But I escaped none of the VCDS or has not locked up somewhat, but it works? You, who dare to test you on this .. good luck! Responds to all questions:) Can you tell me where I would find the head unit installed. behind the glove box under the bench there in a plastic holder.. take the plastic holder to because u need it in ur car.
-
Cortinas OEM manuales a precio rompedor por si alguno se anima (tienen 7 disponibles) http://cgi.ebay.pl/ws/eBayISAPI.dll?ViewIt...em=250489554431
-
¿Un alma caritativa que nos de luz sobre el tema, please? Yo lo he buscado por el ETKA pero no hay manera. Igual alguno de los que cambiaron a posteriori la centralita la pilló con esa referencia extraña ¿no? Saludos.
-
Te entendemos perfectamente. Los del monocromo te ayudaremos encantados (yo por lo menos) en lo que podamos...yo yengo el Etka y el Elsawin pero el vag-com no, pide y se te concederá... Saludos.
-
Alfombrillas premiun para el audi A6
Kolari responde a guanterarefrigerada de discusión en Audi A6 / Allroad C6 (2005 - 2011)
...lo siento pero hay veces que no me puedo reprimir...